How To Make Money with Amazon Native Shopping Ads
How To Make Money with Amazon Native Shopping Ads

Make Money with Amazon Native Shopping Ads
Have you been considering replacing AdSense with something that pays you more? Are you tired of low paying advertisements & earning less than you should be from your blog?
Well today, I’ve got something very interesting to share with you which can help you make a lot of money.
In particular, if you have a niche blog & get a lot of traffic from the U.S.A, this new ad monetization network can do wonders for you.
Amazon has always been (and still is) a popular choice among publishers because of their Affiliate program.
For more on Amazon Associates, read:
Recently, Amazon has launched many new types of ads which you can use to monetize your blog.
One of them is Amazon Native Shopping Ads.
In this guide, I will share everything you need to know about getting started with Amazon Native Shopping Ads. I would suggest you try this ad type for 2-4 weeks & see how it works out for you.

What are Amazon Native Shopping Ads & how do they work?

Amazon Native Shopping Ads are similar to AdSense in terms of showing contextual ads.
It shows relevant ads based on the page where ads are being displayed. Once you place the ad codes on your blog (you only need to do this once), it automatically scans the content of the page & displays products based on the keywords used within the article.
Amazon native shopping ads
Unlike AdSense, here you will be earning money for actual sales.
Remember: Amazon also pays for other products purchased by your referred users.
To make it easy for you to understand, here’s an example:
  • Let’s say you have a visitor named Paul:
  1. Paul clicks on one of the ads (Native Shopping Ads) on your blog & goes to the Amazon site via your link
  2. He purchases any product on Amazon
  3. You get a commission of 4% – 8% (depending upon volume)
Now let’s say the product that Paul purchased cost $100:
  • 4% of $100: $4
This is a typical scenario. If Paul decides not to purchase the product recommended by you, but instead purchases 10 different products worth a total of $1000, you will still be earning 4% of his total purchase.
  • 4% of $1000: $40
You are earning $40 from just one referral.
In case you didn’t know, Amazon is the top e-commerce site in the world & their conversion rate is much higher than most every other e-commerce site.
In short:
At the time of this writing, there are three variants of Amazon Native Ads:
  • Recommendation Ads: Allows Amazon to automatically recommend the best-matched products based on your web page content and your visitors.
  • Search Ads: Allows you to drive recommendations based on a search phrase determined by you or your visitor.
  • Custom Ads: Allows you to specify the products from Amazon.com that you want to promote.
Ads are responsive, so it will work with all screen sizes.
One limitation is that Native Ads are only available for the Amazon U.S. program.  You might want to use a geo-targeted ad server such as DPF to serve up your ads. (If you know of other solutions to show ads based on a user’s geographic location, do let us know in the comment section).
Before you move ahead, you might want to spend 5 minutes reading the FAQ about this new monetization offering from Amazon.

Getting started with Amazon Native Shopping Ads:

In this section you will learn:
  • How to create ad codes for Native Shopping Ads
  • Tricks to make your ads more relevant
  • Implementing ad codes on your WordPress site (or any other website)
If you have an existing Amazon affiliate account, you can get started right away. If not, you will need to apply for one first.
Head over to this page & click on “Create Ad Code”. You can select from three ad types & for this tutorial I have selected “Recommendation Ads”:
Create Amazon Ad code
On the next page, you have the option to select categories from which you want the products to be displayed.
This is an important step because if you show products relevant to your website content, you are more likely to make more conversions.

Amazon display ads configuration
As you can see in the above image, I have selected the categories which are relevant to my blog (technology blog). Once you have done this, scroll down & configure the rest of the options which are pretty straight forward.

Configuring Amazon display ads
Once this is done, all you need to do is place the ad codes on your blog. If you are using WordPress, you can use the plugin Ad Inserter. This is a free plugin & will allow you to place ads anywhere in your blog.
Here is how I have used this plugin to place Amazon ads after my content:
Insert Amazon ads WordPress
Another plugin that you can use is the Ad Injection plugin for WordPress . When I placed the ad codes on my tech blog (ShoutMeTech), it started displaying ads instantly.
Example Amazon Display ads
Note: If you are going to place Amazon Display Ads on multiple different websites, I suggest creating a tracking ID for all of your blogs. This is going to be pretty useful when measuring the performance of each blog.
Update: As promised, here is my earnings report for the last 7 days:
Amazon native Ads earning report

Are you using Amazon Native Display Ads on your website? How’s it working out for you?
Do share your review & your feedback with us in the comment section below.
Here are a few more articles about earning money from your blog:

Here Is How Your Company Blog Can Make Money Without AdSense

Here Is How Your Company Blog Can Make Money Without AdSense

Monetization of Business Blogs
Are you a web design company or a business with a blog? Do you want to make money from your blog without affecting your business’s sales?
If you are using, or are planning on using AdSense, I recommend that you don’t. One of the major problems with AdSense on a business website is it may show an ad from one of your competitors, and you will lose out on a valuable lead for a few measly cents. I have talked about this in detail before.
Instead, you need to find a way that you can make money without negatively affecting your business.

How To Make Money From Your Business Blog & Not Lose A Lead:

So now that AdSense and other contextual ad networks like Chitika and Infolinks are out of the equation, what can we do?
(Note: Contextual ad = Advertisement shown based on page content)
The ideas that I have shared below will help you build relations and connect with authorities in your industry. As a result, you will make money.
White Label (or Private Label) Reseller
white label reseller
Suppose you have a web hosting company.
Your customer who is buying hosting from you might require services to design & create their website. They may need a social media/digital marketing company to market & promote their website as well as an SEO company for SEO related services.
In short, anything that will help them build & grow their website will potentially be of value to them.
You can partner with the other “good guys” in your industry who offer such services to become that company’s white label reseller. This way, that company will get more clients, and you will be selling more services under your brand name (i.e. making money).
For example:
A web design or social-media company can start a reseller hosting business (costing less than $40) by selling domains and hosting to their customers. This way, the customer stays in the brand’s ecosystem, and this company can become the customer’s 360* solution.
  • Fact: All big multi-national companies use this technique to become a global company. World-class companies like IBM/Accenture/Convergys/etc. sub-lease their projects to other firms.
To get started with this, you need to talk to the marketing and/or business development people of the companies you want to become a white label reseller for. If you are a well-established name in the industry, I suggest talking to the CEO or founder directly.
Tip: Some companies will not have a private label program yet, but if you explain how it can help both of you, there is always a first time for anything. You can also create a private page or .pdf document explaining your offering & use it to pitch to companies.
  • How do you let the customer know about these add-on services?
To start with, have a page set up on your website providing these services, and all leads via the contact form will go to a collaborated email address.
Alternatively, since all leads are being generated on your platform, it’s safe to keep them under your brand banner. You can create an email address like service@domain.com or work@domain.com (learn how to create such email addresses for free) & share the login details with the other company.
For the first timer, it will take a few months to build the perfect workflow, but once trust is built with the company, you will have a good arrangement to speed up & automate this process.
Most progressive companies won’t deny your offer. It’s a win-win situation for both of you.
At times, however, traditional companies won’t get into such deals until they are sure your blog can deliver enough sales. This is where your social & negotiation skills come into play.
  • Tip: Look for companies around you. See which companies have offered you quality services in the past, and see if their services fit into your business offering. Much of the time the best collaborations are with freelancers or small start-ups that you have worked with in the past.
But do remember, your goal here is to work and grow together.
Affiliate Marketing
White label reselling is good, but not necessarily the best way to go.
For example, one of my friends is a life-coach & a fashion blogger. White label reselling might not fit so well with her existing business model.
If this is your kind of situation, you can monetize your blog using affiliate marketing. This is more or less the same as running ads, but the difference is that you are in complete control of the ads.
And unlike white label reselling, instead of offering services, you direct users to another brand. On successful conversions, you earn money.
Example:
If you are a web design company who offers website design services, you can join a web hosting affiliate program & earn anywhere between $50-$200 per successful conversion simply by recommending something your client may need.
One important thing that you want to keep in mind: Your recommended companies should not be offering any of the services that you are also offering.
Tip: You can check out this extensive eBook on affiliate marketing for more information. This book covers everything you need to know about affiliate marketing & making money from your blog.
For your business blog, you can create a “resources” page like this, and recommend some of the best affiliate products that are relevant to your customers.
To find the best product to promote, ask yourself this question: What product or service does my customer/client need immediately after my services?
Advertisement Page
Advertisement page
No blogger can deny the importance of an advertisement page.
In the marketing industry, it’s called a Media-Kit.
Having an advertisement page opens the door for possible advertisers who may see value in advertising their product or service on your site. Eventually, it’s your call whether or not to entertain any possible advertisement offer.
In general: A direct advertisement can do wonders for your overall income.
Did you know ShoutMeLoud earns $20K every year from a single direct advertisement? (Check here.)
This wouldn’t have been possible without the advertisement page which is located here. It helps advertisers know the potentials of advertising on my blog, and gives other necessary details to help them make an informed decision.
If you don’t have an “Advertise Here” page on your blog, I suggest you make one right now. Here are the 15 best Media-Kit pages to help you find inspiration for your own.
There are many more ideas which you can use to monetize your business or company blog.
But you should always:
I would recommend focusing on affiliate marketing as it’s the quickest way to earn a huge amount of money from a quality blog. And making an advertisement page will pay off in the long run. White-label reselling can happen and be profitable, but you need to identify a good company to work with.
Here are a few more ideas to earn from your blog:
What other ideas do you have for fellow business bloggers to monetize their blog? How are you doing it? Let us know in the comments section.
Read this & all others posts from ShoutMeLoud on your mobile phone. Download Android app || Download iOS appll

How To Make Money From Google AdSense: Newbie Guide

How To Make Money From Google AdSense: Newbie Guide

Make Money From Google AdSense
Are you looking to earn passive income online? Do you want to work part-time online & pay your mobile & other utility bills? If your answer is yes, this will change your life from here!
Working online has become a lifestyle lately & like you, millions desire to do the same. The interesting fact is; countless users are making a living out of income online. If you have tried researching on how people are making money online, I’m sure you must have read about AdSense few times by now. If not…
This is a complete guide for a newbie like you who wants to work part-time & start earning money via AdSense. By the end of this epic guide, you will have all the required information along with things you need to do to start earning as soon as possible. So let’s skip the basic intro part & learn how people are making money from AdSense by working online & how you can too.

What is Google AdSense & how it can make money for you?

Google AdSense is a free service offered by Google for publishers to monetize their web content. A publisher can be anyone with a blog, Website, Youtube channel or other allowed online property. AdSense has always been most popular ways to monetize the content & stepping stone for people who want to earn online.
The reason for AdSense popularity is because of ease of using it & after initial configuration, all you need to do is sit back & see money coming into your account.  Moreover, they pay in time & you don’t have to worry about being scammed online.
Getting started with AdSense is easy & you need a blog or Youtube channel to get approval for AdSense account. Once you have an account, all you need to do is create ads (Easy process) & place the AdSense code on your blog using free plugins, & AdSense will automatically display ads. Now, When a reader clicks on those ads, you will earn money from it.  After this, your goal is to get traffic to your blog & more traffic you get, more income you will generate.
A word of warning:
If you are thinking this is so easy & you can ask your friends or family to click on the ads, kindly don’t. Google AdSense is a quality ad network that is free to join but they have maintained a high level of quality & any such activities where a publisher is asking to click on ads or using illegal methods to get more clicks,will cost you a disabled AdSense account. Once your account is disabled, it would be hard for you to get back an account.
How much can you earn from AdSense & Income proof:
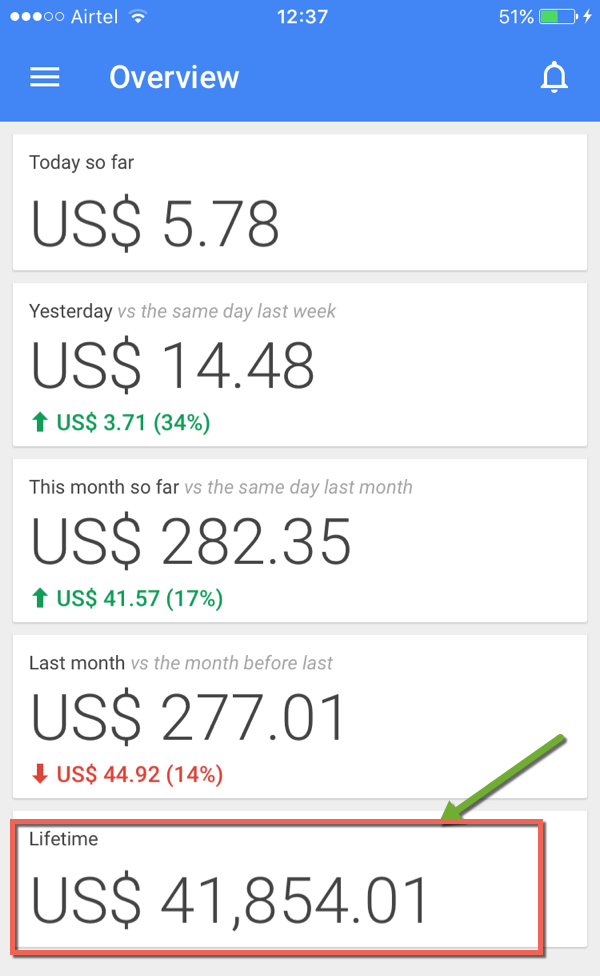
This is the most basic newbies often ask & you can read this guide to understand how much you can earn. There are users who are making thousands of dollars every day with AdSense. Since I can offer only my proof, here is current screenshot of my AdSense earning in the last six years: $41,854 ( INR 27.5 Lakh)
Adsense income proof
I have given links to the best AdSense resources below which would help in setting & maintaining your AdSense account, but first let’s help you in getting a web property that is a requisite before you apply for AdSense account.

Creating your web property for getting an AdSense account:

To apply for an AdSense account, you need to have a web-property. That could be a  blog, website or anything that is allowed by Google. Here I’m listing down three places where you can create a web property in next few minutes to get started. Depending upon your level of understanding, you can start for free or put a little money if you already aware of how things work online.
Create a free blog on BlogSpot:
Create free Blog on BlogSpot
BlogSpot is a free blogging platform by Google & you can create a blog of your own in next few minutes (About 10 minutes). This is the best way for anyone who have never worked online & first time trying to make money. Few important things to keep in mind:
  • Domain name: BlogSpot offers a domain name such as selectedname.blogspot.com. It’s advisable to use a name that is easy to remember, type & pronounce. Read: How to decide name of your blog.
  • Niche: Start posting articles in one particular topic. Be it finance, technology, fashion food or anything. Ensure every post you write should have more than 400+ words with images. Writing an article on BlogSpot or all other modern platform is quite easy. Here is how you select the niche of your blog.
  • Design: When you are setting up your first blog on BlogSpot, you will be using any of the template offered by them. They are good, but you can always use a 3rd party free template to make your BlogSpot blog look more professional. Here is a resource for premium looking free BlogSpot template that you can use on your blog.
  • Pages: Posts are for writing articles & pages are for important pages like about, contact & so on. Ensure you create & add About/Contact page from day one. Your about page will have a great impact on your blog visibility & here you can learn why it’s so crucial to have an about page.
Here is a guide to help you create a free blog on BlogSpot. There is also a video embedded in the post which would make the learning easy for you.
Or create a WordPress Blog (Smart & professional way)
This one I recommend to those who have a prior experience of working online or have an idea of how things work. More than 22% of the websites in the world is powered by WordPress & is seen as most respected blogging platform of all time.
The idea of having your hosting & domain name is exciting & seems challenging at first, but WordPress makes it easier for anyone with no experience to gets started with their blog online. Read: How to buy domain & hosting for WordPress blog.
WordPress-eBook
You should download this free eBook on WordPress setup to learn everything about creating a blog on WordPress. For additional questions, feel free to ask me in the comment section. If you are in no mood to read eBook, here are resources that you can refer to right now & create a WordPress blog of your own.
Create a Youtube channel & upload original videos:
YouTube AdSense earning
This is another popular method that is used to get an approved AdSense account. Everybody is not keen of writing & many users love to create & record videos. If you are one of those, you should use this method to make money from AdSense.
You need to create an account on Youtube, create a channel (It’s free) & start uploading original videos that you have created. You can use your mobile phone to record some original watchable videos, or you can use video recording & editing tool like Camtasia to create screencast videos.
What is screencast videos
To give you an idea of what others are doing, HouseWives are creating cooking-related videos, girls are creating fashion related videos, geeks are creating gadgets videos & so on. The possibilities are endless & there is space for everyone. You should check out this & this article to master the basics of Youtube blogging.
Once your Youtube channel is up for few days with constantly video upload (5-10 quality videos), you are most likely to be eligible for making money from uploaded videos. You can head over to this link & apply for monetization. Here you can find more information on Youtube AdSense monetization.
Web property checked- What Next?
Once you have followed any of the above methods to create a web property for yourself. It’s time to apply for AdSense account.  The hard part is to get an approved account & this could be done only if you are committed & working on your web property seriously. Do remember, this is not a get rich quick scheme & requires patience & dedication. The joy part is, you will be paid handsomely for your dedication over the time which is why online money making is so lucrative.
Apply for AdSense:
The next step is to fill out the AdSense application & wait for approval. Here are guides/tutorials (Open them one by one) which will help you to get AdSense approval.
Usually getting an approved account takes up to 7 days & in between if your application got rejected, don’t be upset & try to find out what is missing on your blog. Google need valuable publishers & it’s hard for first-timer to get things right. 
Do you know, it took me more than three retries to get my AdSense account approved. Here are few resources & case-studies from users who got an approved account.
AdSense approved: What should you do next?
Let me promise you one thing, the day you would see first few dollars in your AdSense dashboard, that feeling will be priceless. Now, since you have tested the joy of making money online, your next focus should be increasing the revenue.
Next step for you is to increase your traffic as more traffic will help you generate more money. Not only that, learn some basic AdSense optimization tips like Ad placement and targeting high CPC Keywords. Once you have done all this (Should take a couple of months), then you can focus on creating niche based AdSense sites. You can get a free blueprint for the same from here.
As Henry Ford said the above lines, you can join the league of extraordinary people who are working part-time & generating income online. Or you can be like many, who would wait for some day for the magic to happen. Since you read until here & serious about making a passive income, I have only one thing to tell you:
Feel free to ask any questions regarding starting your first blog for AdSense. If you are stuck anywhere, you can always ask questions in ShoutMeLoud Bloggers forum, where many readers like you hang out to help each other.
If you find this guide useful, do share it on Facebook & Twitter. What should be the next article in this series? Let me know in the comment section below.

How you Built A Micro-Niche Site Earning $174/Month from AdSense

The internet is full of opportunities to make money, and blogging is one of the smartest and most ethical ways available.
One misconception about blogging is that you need to work day and night to make money. There’s some truth to that if what you’re trying to do is create a name for yourself and/or build a brand.
But if your goal is simply to earn money within a short period of time (but with long-term gains), then there are many shortcuts available.
Let’s take a look at one such shortcut:
  • The micro-niche blog.
In this guide, I will give you a detailed example of a micro-niche blog that I created which is currently making $174/month from AdSense, and an average of $100/month from affiliate marketing. All of this only took a few hours of work to set up.
Niche Blog Ideas
This is a blueprint for creating a micro-niche blog, and you can use it for any topic or niche that you like. In my case, I didn’t use a content agency, so I picked up a niche that I enjoy reading and writing about. However, if you are not great at writing, you can hire writers from sites like Contentmart or Textbroker.
This micro-niche blog has made me over $2000 in the past year, requiring only 40-50 hours of work!

Why start a micro-niche blog?

First of all, following many algorithmic changes from Google, niche websites now rank higher in search engines than non-targeted sites.
If you create a high-quality website on any particular topic, your chances of ranking higher are stronger than any existing authority website out there.
Plus, you won’t have to worry day and night about keeping your blog evergreen.
Once you’ve done the hard work to create your niche site, the next step is to wait for the money to be deposited into your account.
So let me give you the micro-niche blog blueprint that I’ve created.
Remember: This is the exact method that I followed, and you can follow this blueprint to create a successful micro-niche blog of your own.

The Complete Blueprint To Building A Niche Website That Makes Money:

1. Select Niche & Domain
The most important thing you need to do is find a niche that you are comfortable with.
Make sure to think about the potential commercial and popularity aspects of your niche.
Since the target is to make money from the blog using AdSense, it is very important to choose a topic that is popular in countries like the U.S. and the U.K., and that has high commercial value (high CPC).
In my case, I chose a topic called “Cydia”, which is a jailbreaking tool for iOS devices, and very popular among iPhone users. I chose this topic because I was very comfortable with the subject matter, and the expiration time on this topic was quite high. Furthermore, it had a good search rate in Google.
To find out things like CPC, Google search rate, popularity, and competition, I used LongTail Pro.
November 2016 update: This niche is now saturated, but this blueprint is still valid.
For keyword research, I used SEMrush. I like SEMrush because you just need to put the website link of the most popular site in your target niche & it will show all of the keywords that site is already ranking for.
Along with that, SEMrush lets us do a complete SEO audit & a few other things that help bloggers and webmasters grow organic traffic. (You can try SEMrush for 14 days using this special promo link!)
The next step is to get a nice domain name. Since it’s a micro-niche site, I would suggest including your keyword in the domain name. Ensure it doesn’t look spammy & add a little flavor to it by using words like “Guide”, “Users”, “101” & so on.
For my domain, I settled on CydiaGuide.com.
2. Keyword Research & Content Planning
This is the most interesting part, and it’s a little time-consuming. But it pays off well in the long run.
I usually suggest using a Google docs spreadsheet to jot down your research to keep everything organized.
For content planning, I was clear about a few things I needed to do:
  • Choose topics that would be in demand for a long time.
  • Design this micro-niche site like Wikipedia.
  • Choose keywords that are driving traffic and have a high CPC.
Instead of being particular about choosing only high AdSense CPC keywords, I created a mindmap of content, which was more like an FAQ.
For example:
  • What is [topic]?
  • How to use/install [topic].
  • Advantages and disadvantages of using [topic].
  • Important facts about [topic].
These were some of the basic ideas I started with before getting into detailed keyword research.
I then used SEMrush to find keywords.
Next, I chose a few related blogs on my topic & as I mentioned earlier, I used the same tool (SEMrush) to find the precise keywords which are already driving traffic to these sites.
Note: SEMrush is a paid tool, but you can use this link to try SEMrush completely free for 14 days (a value of $150).
Keyword research and content planning
By the end of this process, I had at least 20+ topic ideas for my micro-niche website!
Next, I spent a few hours writing 4-5 blog posts, and then one post each day for the next several days. Within a few days, I had 15 high-quality evergreen posts and my content was ready to go. (Evergreen posts have a 2-3 year expiration date, meaning that these topics should be relevant for at least the next 2-3 years.)
As I said earlier, if you are not good at writing, there is no harm in hiring someone to write for you. Managing a blog takes a lot of work, and it’s important to make sure you have good content to manage.
November 2016 update: You can find a more detailed step by step guide on micro niche blogging over at Shout University.
3. Setting Up The Micro-Niche Blog
This part of the set-up was very easy for me. If you know how to create a blog on WordPress, then this step will be easy for you as well. Beyond this, your content will be the main attraction.
The following is a list of the exact tools I used to create and set up my blog:
Plugins:
  1. Yoast SEO for site SEO (click here to see the video tutorial).
  2. Akismet for preventing comment spam.
  3. Auto Post Thumbnail for automatic generation of featured images. (optional)
  4. SocialWarfare for social bookmarking icons.
  5. Jetpack by WordPress for multiple purposes, including stats in dashboard.
  6. No Self Pings to stop self-pinging!
  7. PushPress for faster indexing.
  8. SEO Friendly Images for image level SEO.
  9. Shortpixels for image compression.
  10. WP Super Cache for caching. An alternative is W3 Total Cache.
Additional steps that I followed:
  1. Made the blog’s SEO perfect.
  2. Took extreme care of content quality and keyword score.
  3. Made a few videos on YouTube and linked them to my blog in the description, generating additional traffic. This also helped me generate backlinks.
  4. Submitted my sitemap to major search engines. (Google, Bing, Yahoo, etc.)
  5. Submitted my blog to traffic estimator sites using IMT submitter. Note: Don’t build more than 50 links using them in a day.
  6. Created a logo using a free online logo maker.
  7. Set Up Google AMP.
  8. Set Up Facebook Instant Articles.
Optional (but very good) steps to follow:
The whole idea of the blog was to not do a lot of work, and create a blog that was capable of earning money. For this reason, I didn’t invest much time on branding. The goal was to get great search engine traffic, provide solutions, and quickly make money from this micro-niche blog.
Here is the traffic report:
Micro niche site traffic
Remember, the blog had only 29 posts and had not been updated beyond the first month. At this stage, I had to prepare more content to push traffic again.
The following are a few things that I should have done, and are things that you should do if you are interested in creating a micro-niche blog:
Create A Separate Social Media Page
Social media profiles are helpful in many ways, but I skipped this step because I didn’t want to create a new social media property. That said, it’s always good to add social media profiles to your site and use social media automation. (I use Buffer to share content from this blog on my Google+ and Facebook pages.)
Backlink Building & Promotion
I did not build a single backlink beyond submitting my site to IMT and my YouTube videos. I did not do any promotion apart from a tiny bit of social-media promotion. All traffic is organic, and purely due to the SEO settings of the site.
However, this approach may not work for everybody as it varies from niche to niche. For certain niches, competition is too high & the best way to make your blog rank is by generating high-quality backlinks.
Here at ShoutMeLoud, you can find tons of amazing link building guides contributed by the community. Use the search button to find free link building articles on SML.
Here are a few:
Monetization
For the first couple of months, I only used AdSense, and later I added one affiliate product related to the iPhone niche, which generated an extra income of around $100/month.
However, if you haven’t gotten AdSense approval, then you should use AdsOptimal or Media.net. Both of them work great if you have traffic from the U.S.A or Europe.
Something To Consider
With a $160 investment and 40 hours of work, I made over $2000 in one year. This blog is still making money. The idea is to create a few more niche blogs like this one, thus creating additional sources of online income. I’m working on a new niche site right now called CoinSutra.
For now, this micro-niche blueprint is enough for any minimally experienced blogger to create a money-making site with just a few hours of work.
If you are a member of Pro.ShoutMeLoud.com, you can find all video tutorials (and a more detailed extension of this micro-niche guide) in the AdSense section.
If you have any questions, or if you have any tips to add, I would love to hear from you. Share your thoughts in the comments below!
If you find this micro-niche site blueprint useful, don’t forget to share it!

What is WannaCry ransomware and why is it attacking global computers?

Malicious software has attacked Britain’s health service and companies in Spain, Russia, the Ukraine and Taiwan. What is it and how is it ...